Making a Task Template
ClimaLinks integrates climatic indices into every aspect of the platform, defining ideal conditions for tasks such as requiring cloudless days or avoiding temperatures below freezing. The platform facilitates the easy creation and editing of these indices, enabling a single template to link to multiple tasks based on specific criteria.
Templates in ClimaLinks convert and combine raw weather data into a single score used on the platform to complete functions. For tasks, the index ranges from 0 to 1, displayed as unsuitable (0 to 0.1), unfavourable (0.1 to 0.5), marginal (0.5 to 0.9), and favourable (0.9 to 1.0).
This page guides you through creating a template for a general outdoor activity.
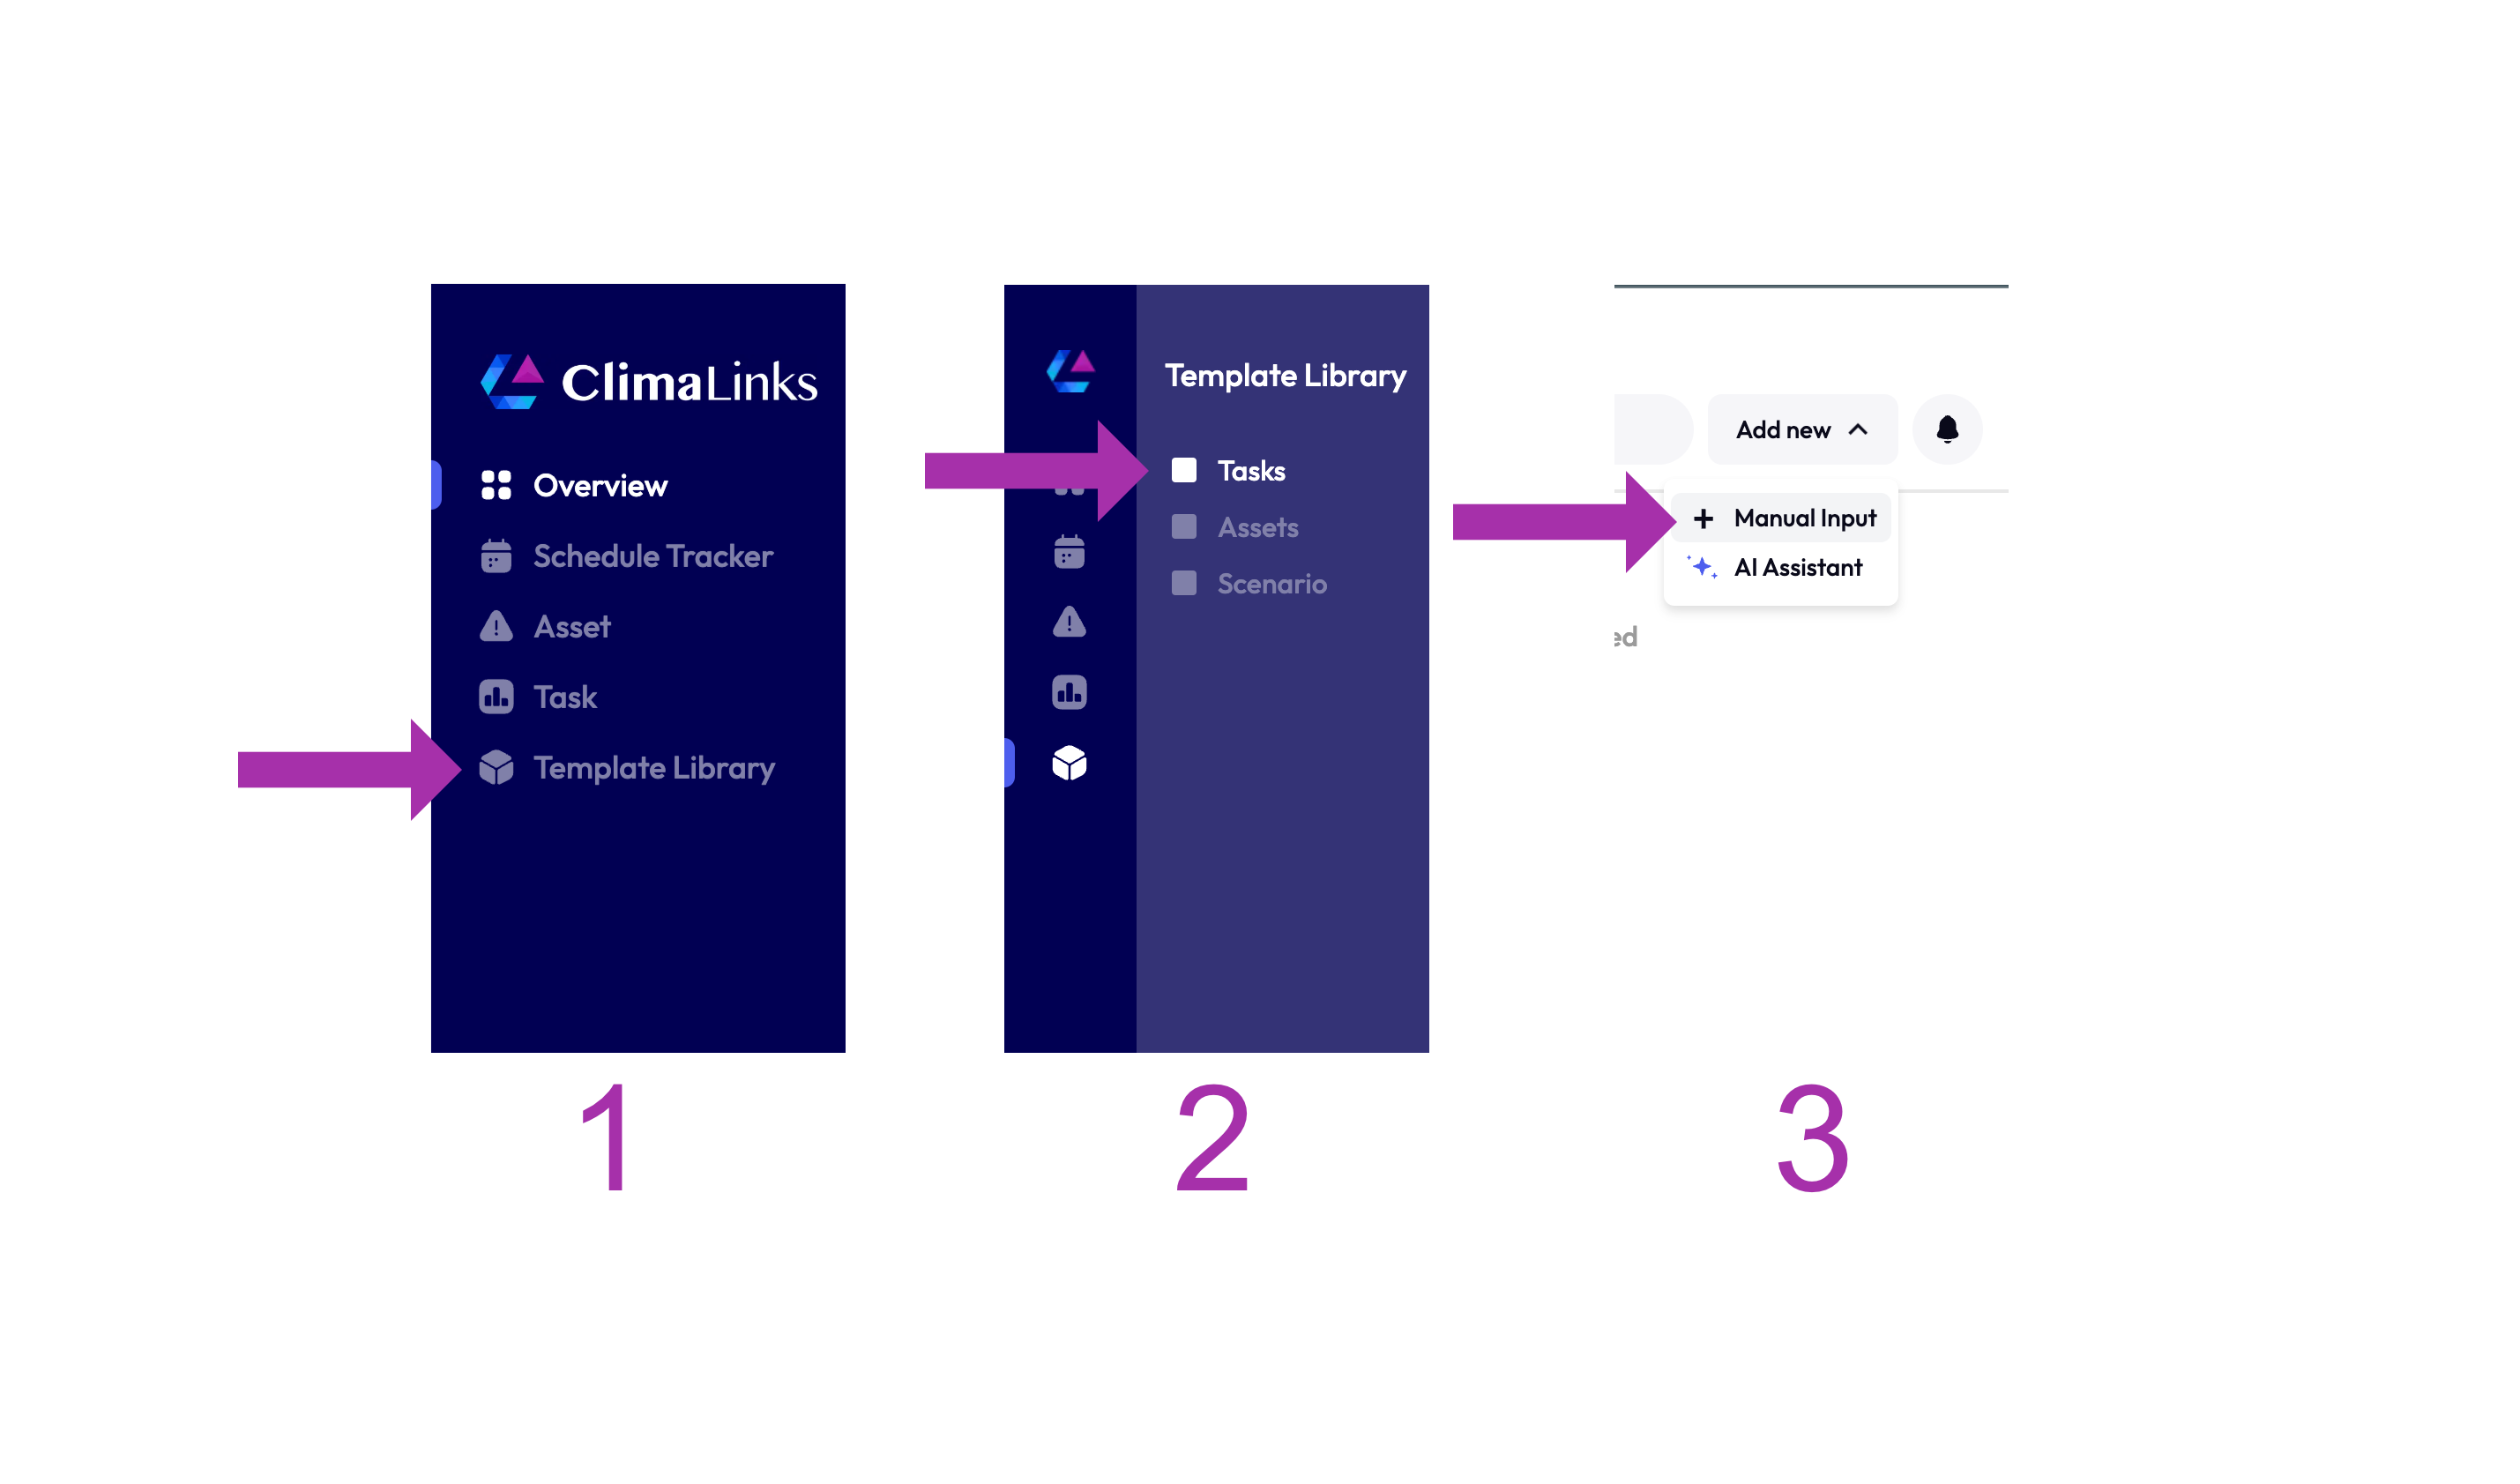
1. Navigate to the Template Library: Discovering Your Starting Point
Begin by going to the template library (1), find the tasks sub-category (2), and opt for the manual creation (3) to get acquainted with the basics. As you grow more comfortable, consider leveraging the AI Assistant to streamline task template creation.
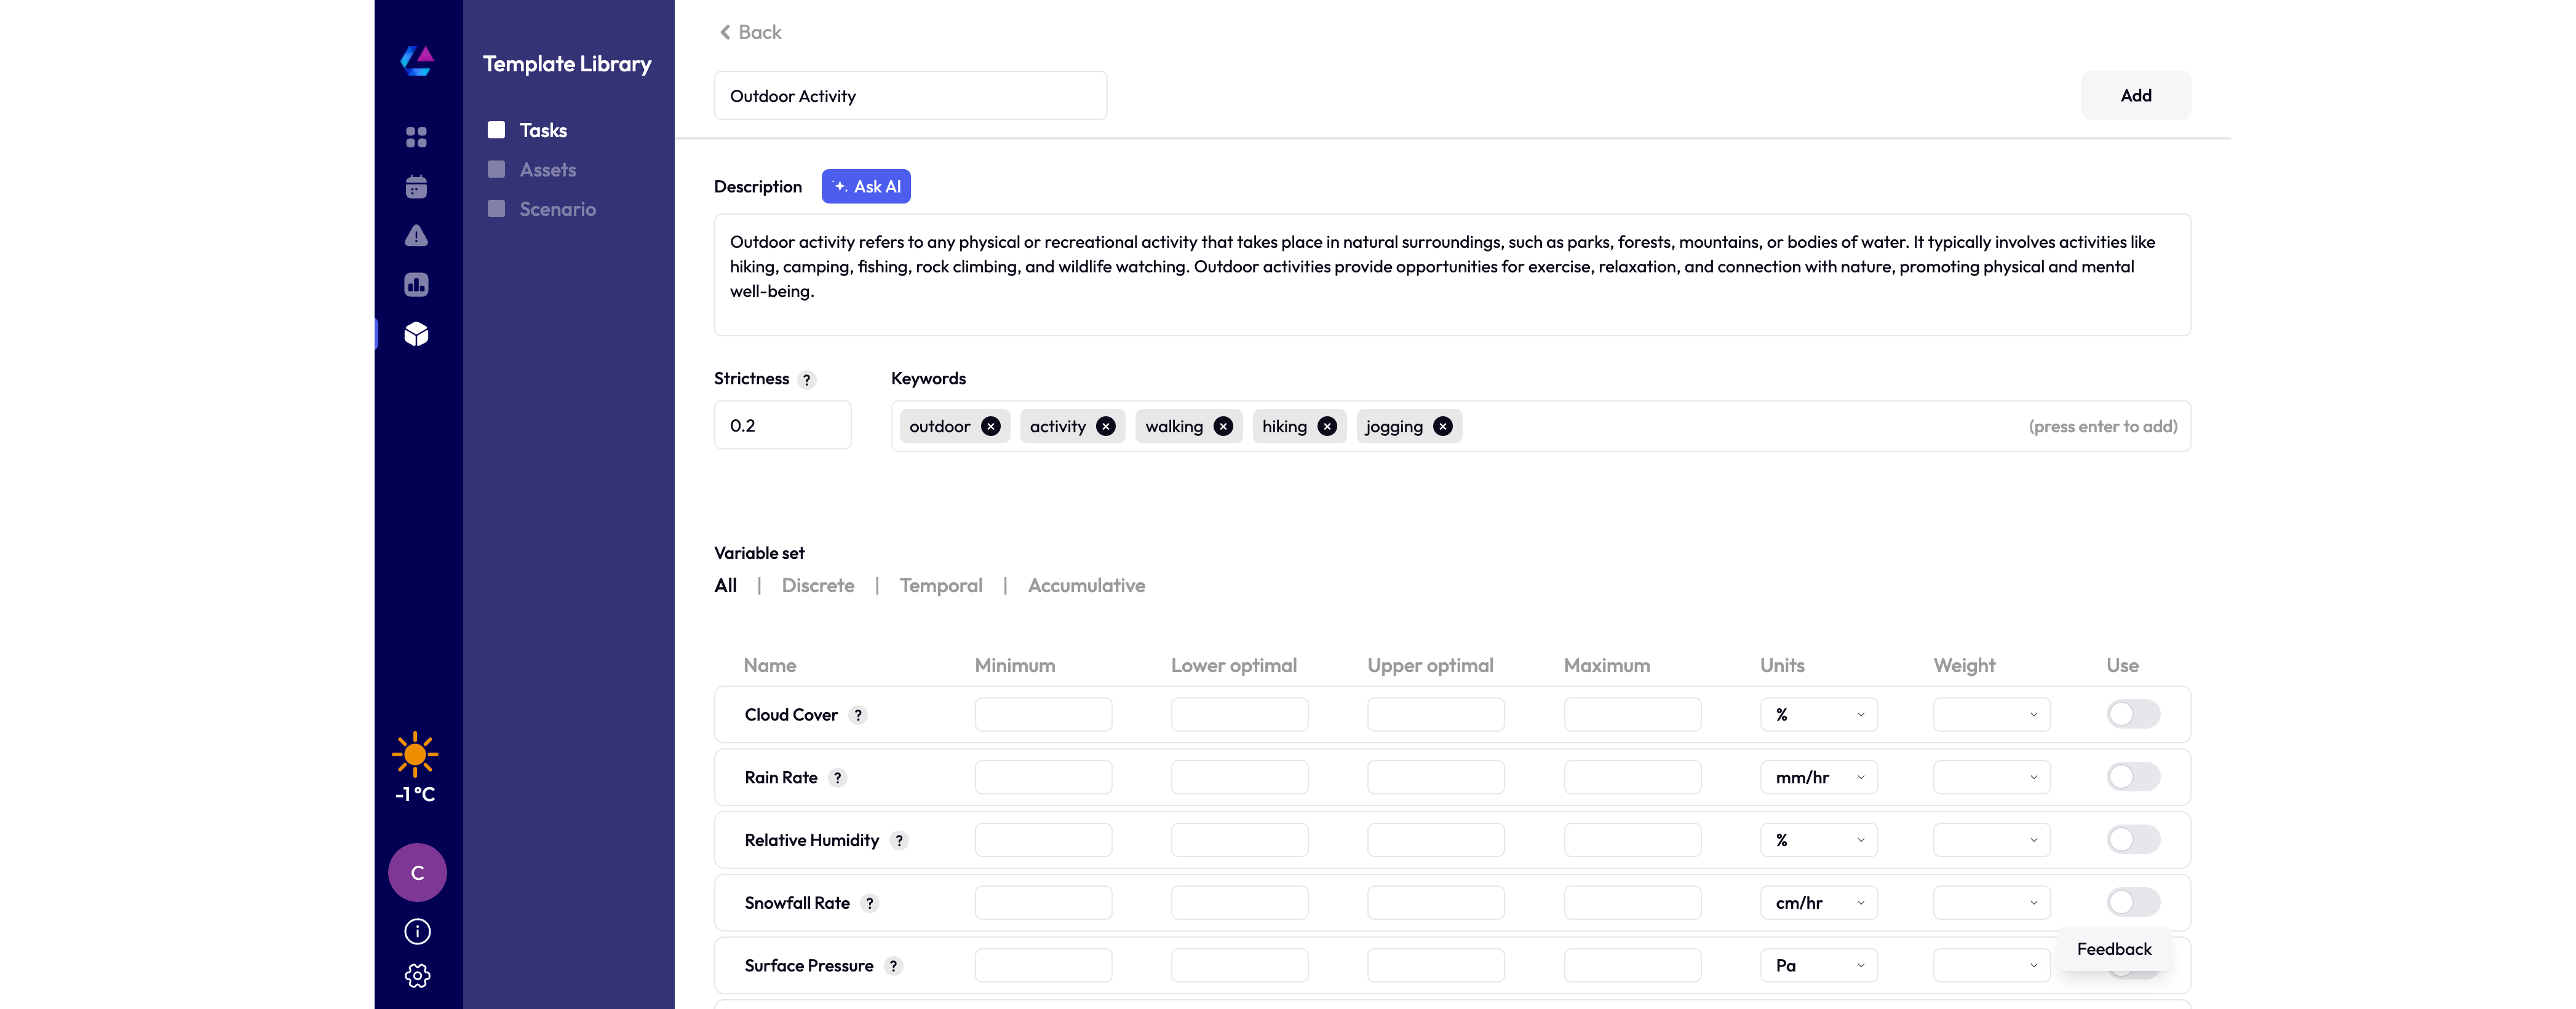
2. Filling in the Basics: Laying the Groundwork
When creating a task template, focus on three primary areas to ensure it is comprehensive and searchable:
- 1. Template Name: The identifier for the template, visible in task overviews.
- 2. Description: A field for descriptive text or notes about the task, with AI assistance available (once title is entered).
- 3. Keywords: For easier searching and organization within your template library as it expands.
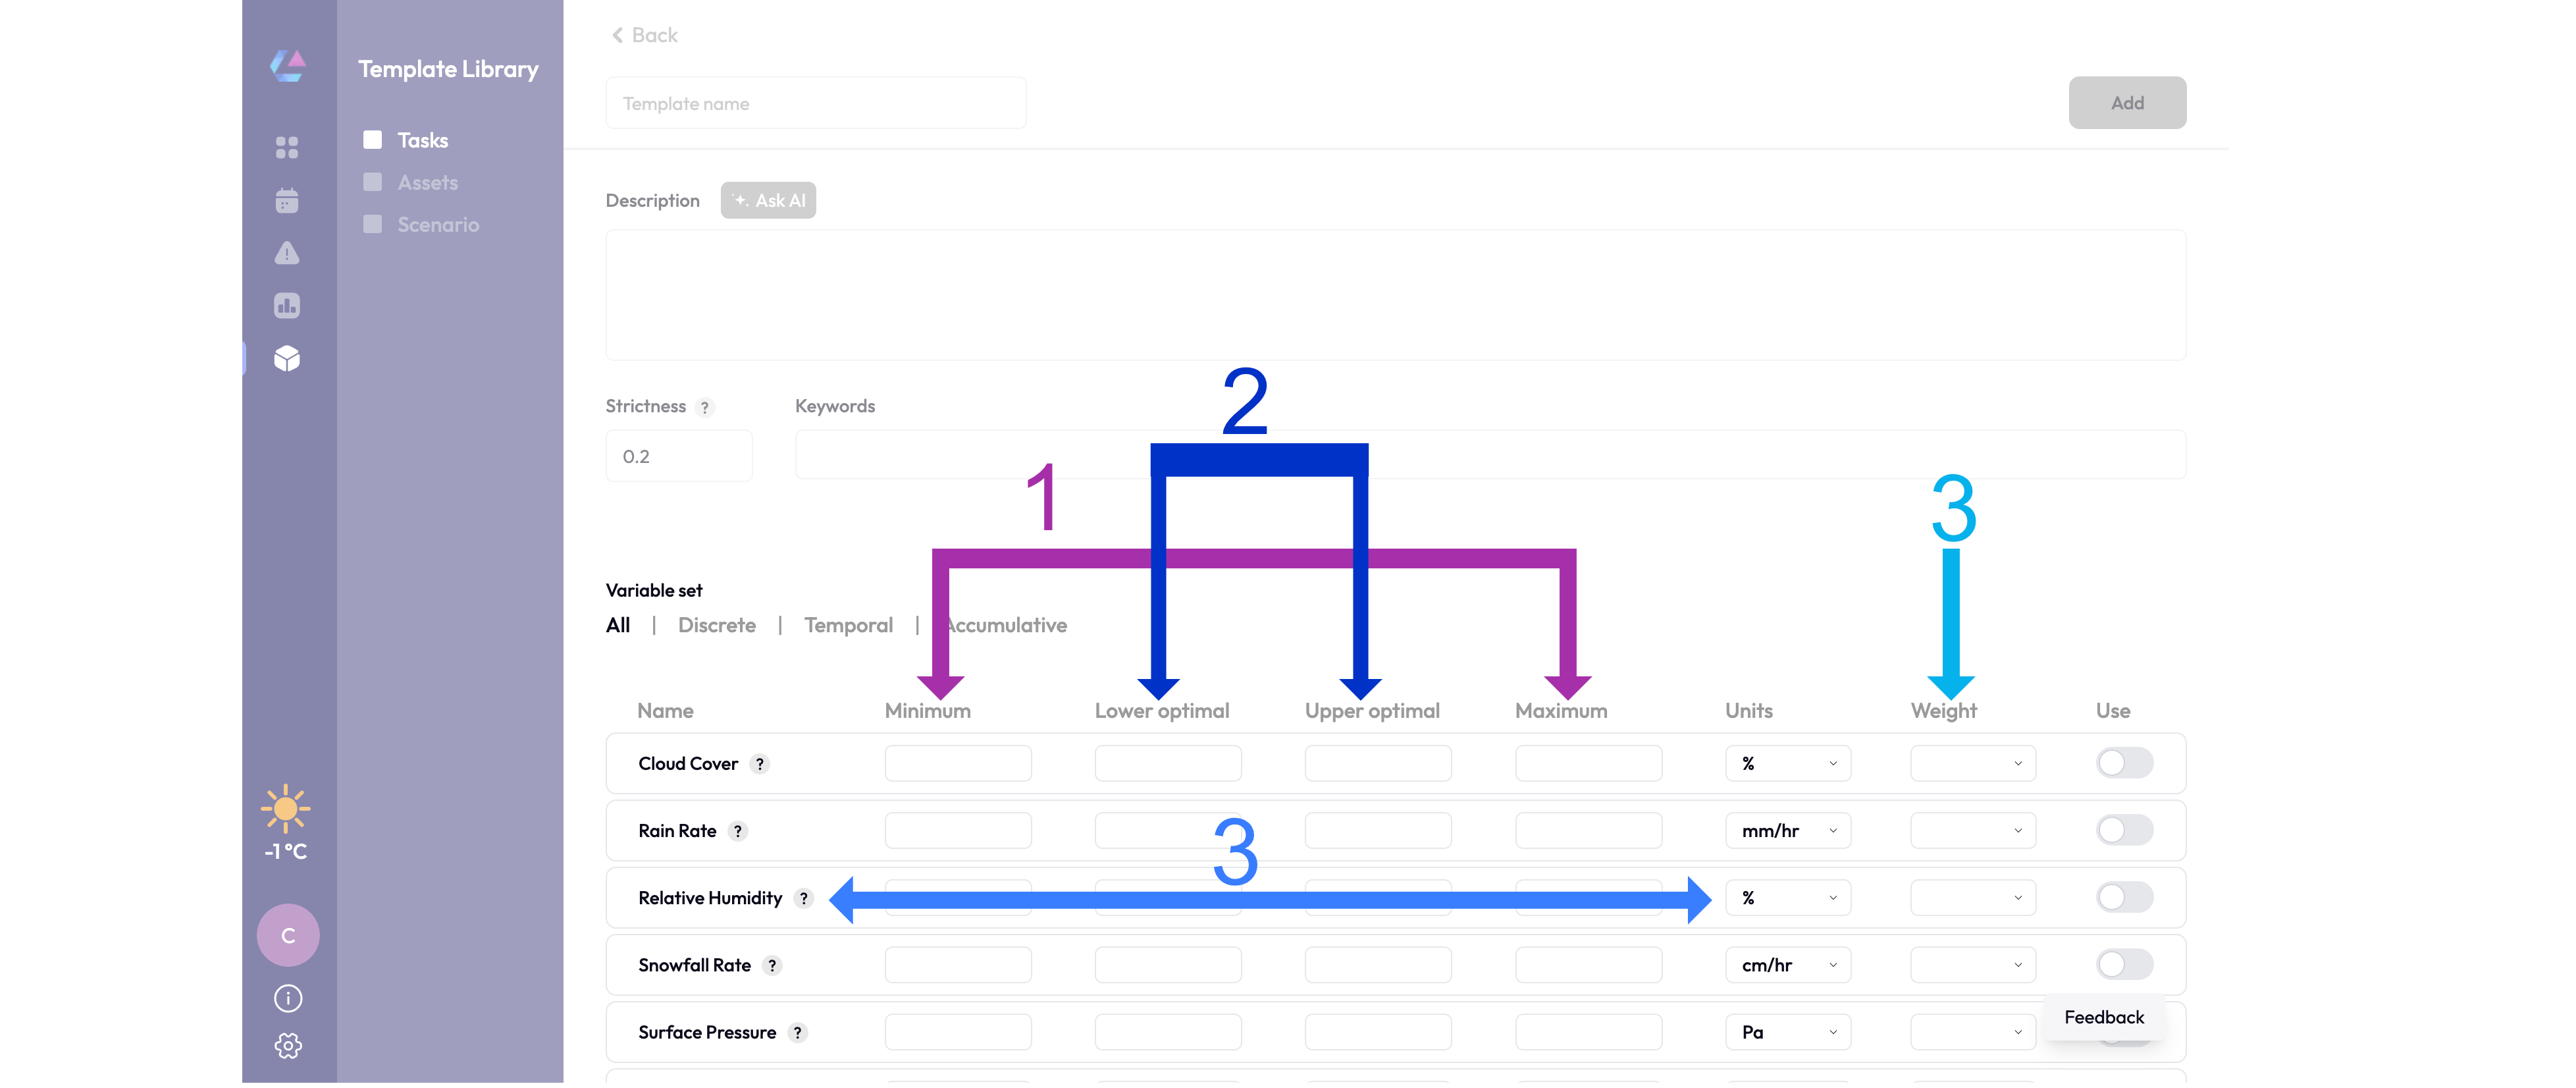
3. Optimizing Weather Variables for Your Tasks: Tailoring Conditions to Your Needs
Dive into the weather variable section on the latter part of the creation screen, where precision meets customization. Here's how to streamline your task templates:
Variable Categories: Understand the essence of your task by selecting from Discrete, Temporal, or Accumulative variables. Whether it's the constant condition of temperature (Discrete), the evolving nature of wind speed (Temporal), or the total impact of rainfall (Accumulative), each plays a pivotal role.
Why It Matters: Choosing the right category ensures your tasks align with actual weather conditions. For instance, if you're planning an outdoor event, focusing on Discrete variables like temperature and cloud cover can help you decide on the perfect day.
Introducing ClimaLinks Variables: Starting with 10 essential variables, your feedback shapes our expansion. Reach out with insights or requests at support@climalinks.com.
3.1 Understanding Variable Entries: Defining Your Criteria
Variables include key aspects:
- 1. Bounds of Acceptance: Define the task's feasible minimum and maximum conditions.
- 2. Optimal Range: The lower and upper bounds considered ideal for the task (lower optimal and upper optimal, respectively)
- 3. Weight Designator: Priority (high, medium, low) for each variable, especially when multiple variables are involved.
- 4. Other aspects include: Preferences for units and hints for human understandable variable rates. Also freely toggle variables at any time for enabling or disabling variables without data loss.
3.3 Weather-Related Rules: Ensuring Template Integrity
Specific rules ensure template integrity:
- 1. Minimum and maximum, lower and upper optimal bounds must follow logical progression without overlap .
- 2. Distinct lower and upper optimal values are required for discrete variables, but not for temporal or accumulative types.
- 3. Discrete variables must have varied optimal values (i.e., optimal lower cannot equal optimal upper); temporal and accumulative variables may have uniform values (i.e., optimal lower can equal optimal upper).
3.4 Quick Tips for Variable Mastery: Enhancing Your Template's Effectiveness
Simplify to Amplify: While tempting to use all 10 variables, a focus on 2-4 can provide a clearer, more actionable insight.
Balance and Gradient: Ensure your acceptance and optimal ranges are not just numbers but represent a meaningful spectrum of conditions. This gradient helps you decipher the weather's language, turning data into decisions.
Actionable Insight: As you set these ranges, ask yourself, "What weather conditions truly make or break my task?" This question guides you to prioritize effectively, crafting a template that resonates with your specific needs.
🔍 See Example
In our example for an optimal outdoor activity index, we selected three variables: cloud cover, rain rate, and temperature. We set cloud cover minimum and optimal low to 0, considering outdoor activity optimal up to 50 percent cloud cover. Rain rate is set to 0 mm/hr across all fields, indicating any rain is unacceptable. Temperature bounds are set from -15 to 37 Celsius, with an optimal range of -5 to 20 Celsius, showing our preference for moderate temperatures. Rainfall is prioritized highest, with cloud cover lowest.

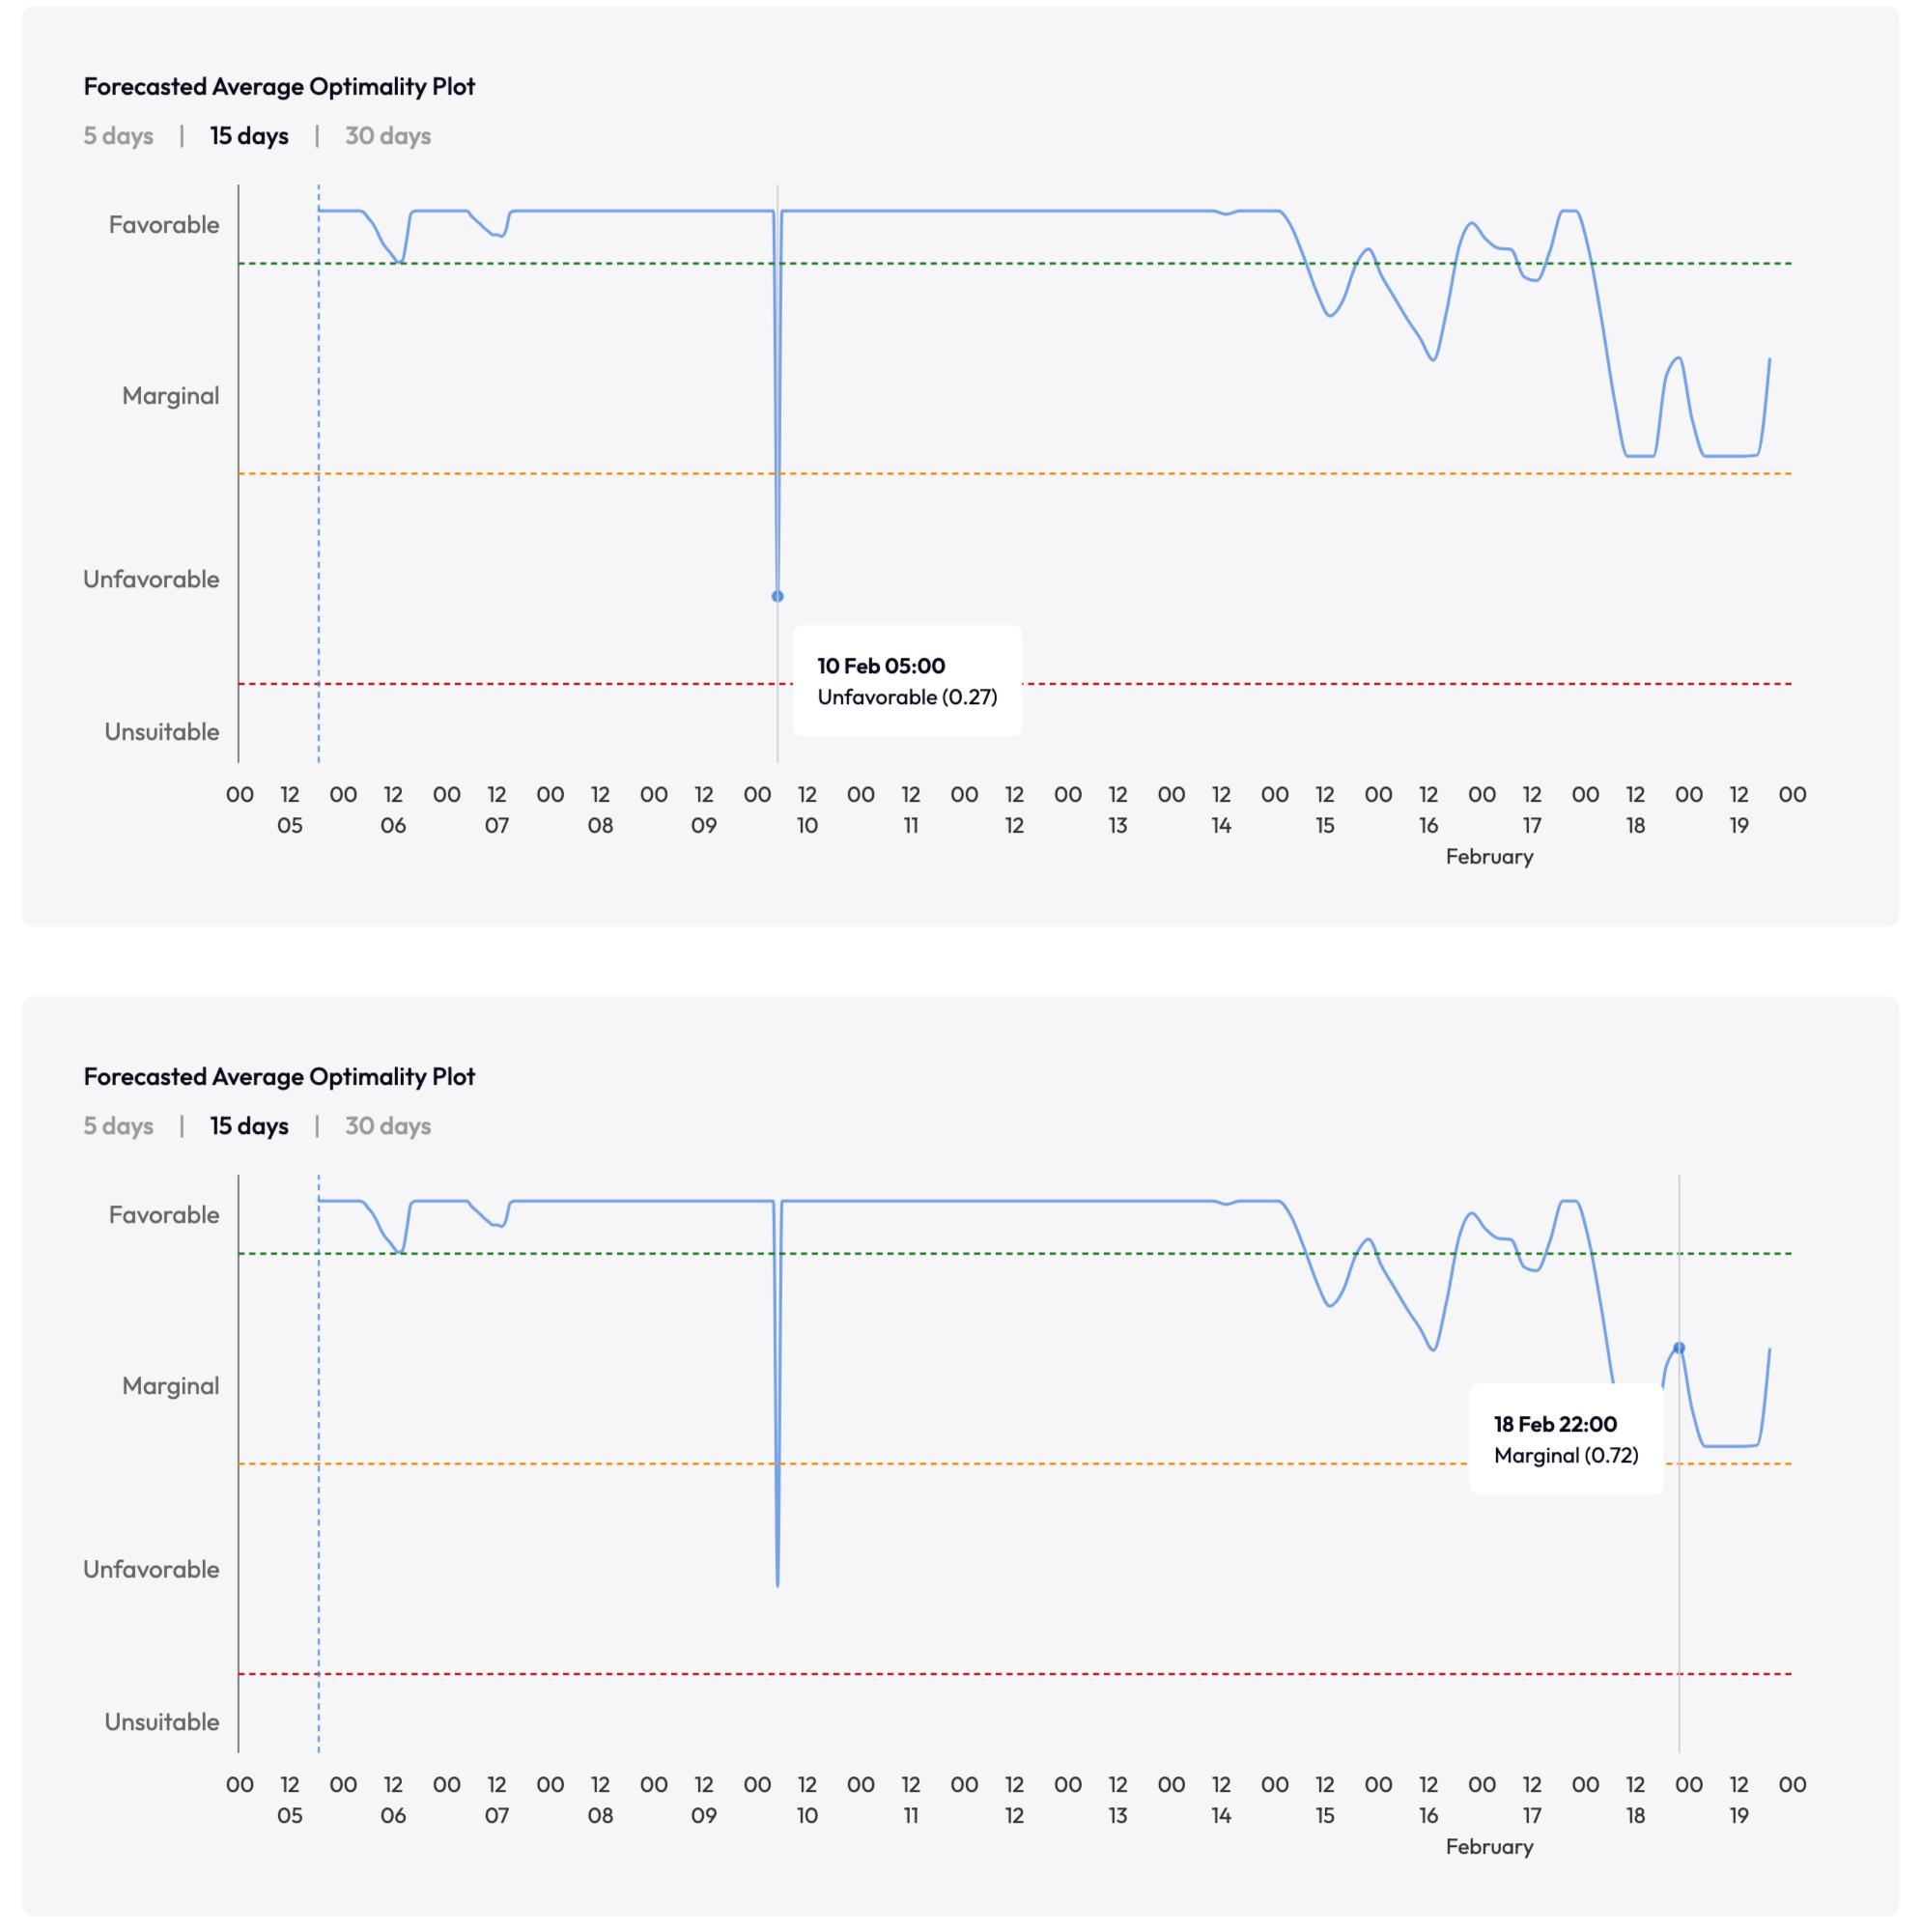
4. Setting the Strictness: Adjusting Sensitivity to Weather Changes
The strictness setting is a crucial tool in ClimaLinks, designed to modulate the index's sensitivity to changes in weather variables. This functionality impacts how these variables are synthesized and interpreted, offering a scale from 0.2, for averaging effects and moderate impacts, to 1, for high sensitivity to even minor variations. While the default setting is calibrated at 0.2 to accommodate a broad range of conditions, we encourage adjustments only for those who have a deep understanding of their specific needs and the system's capabilities.
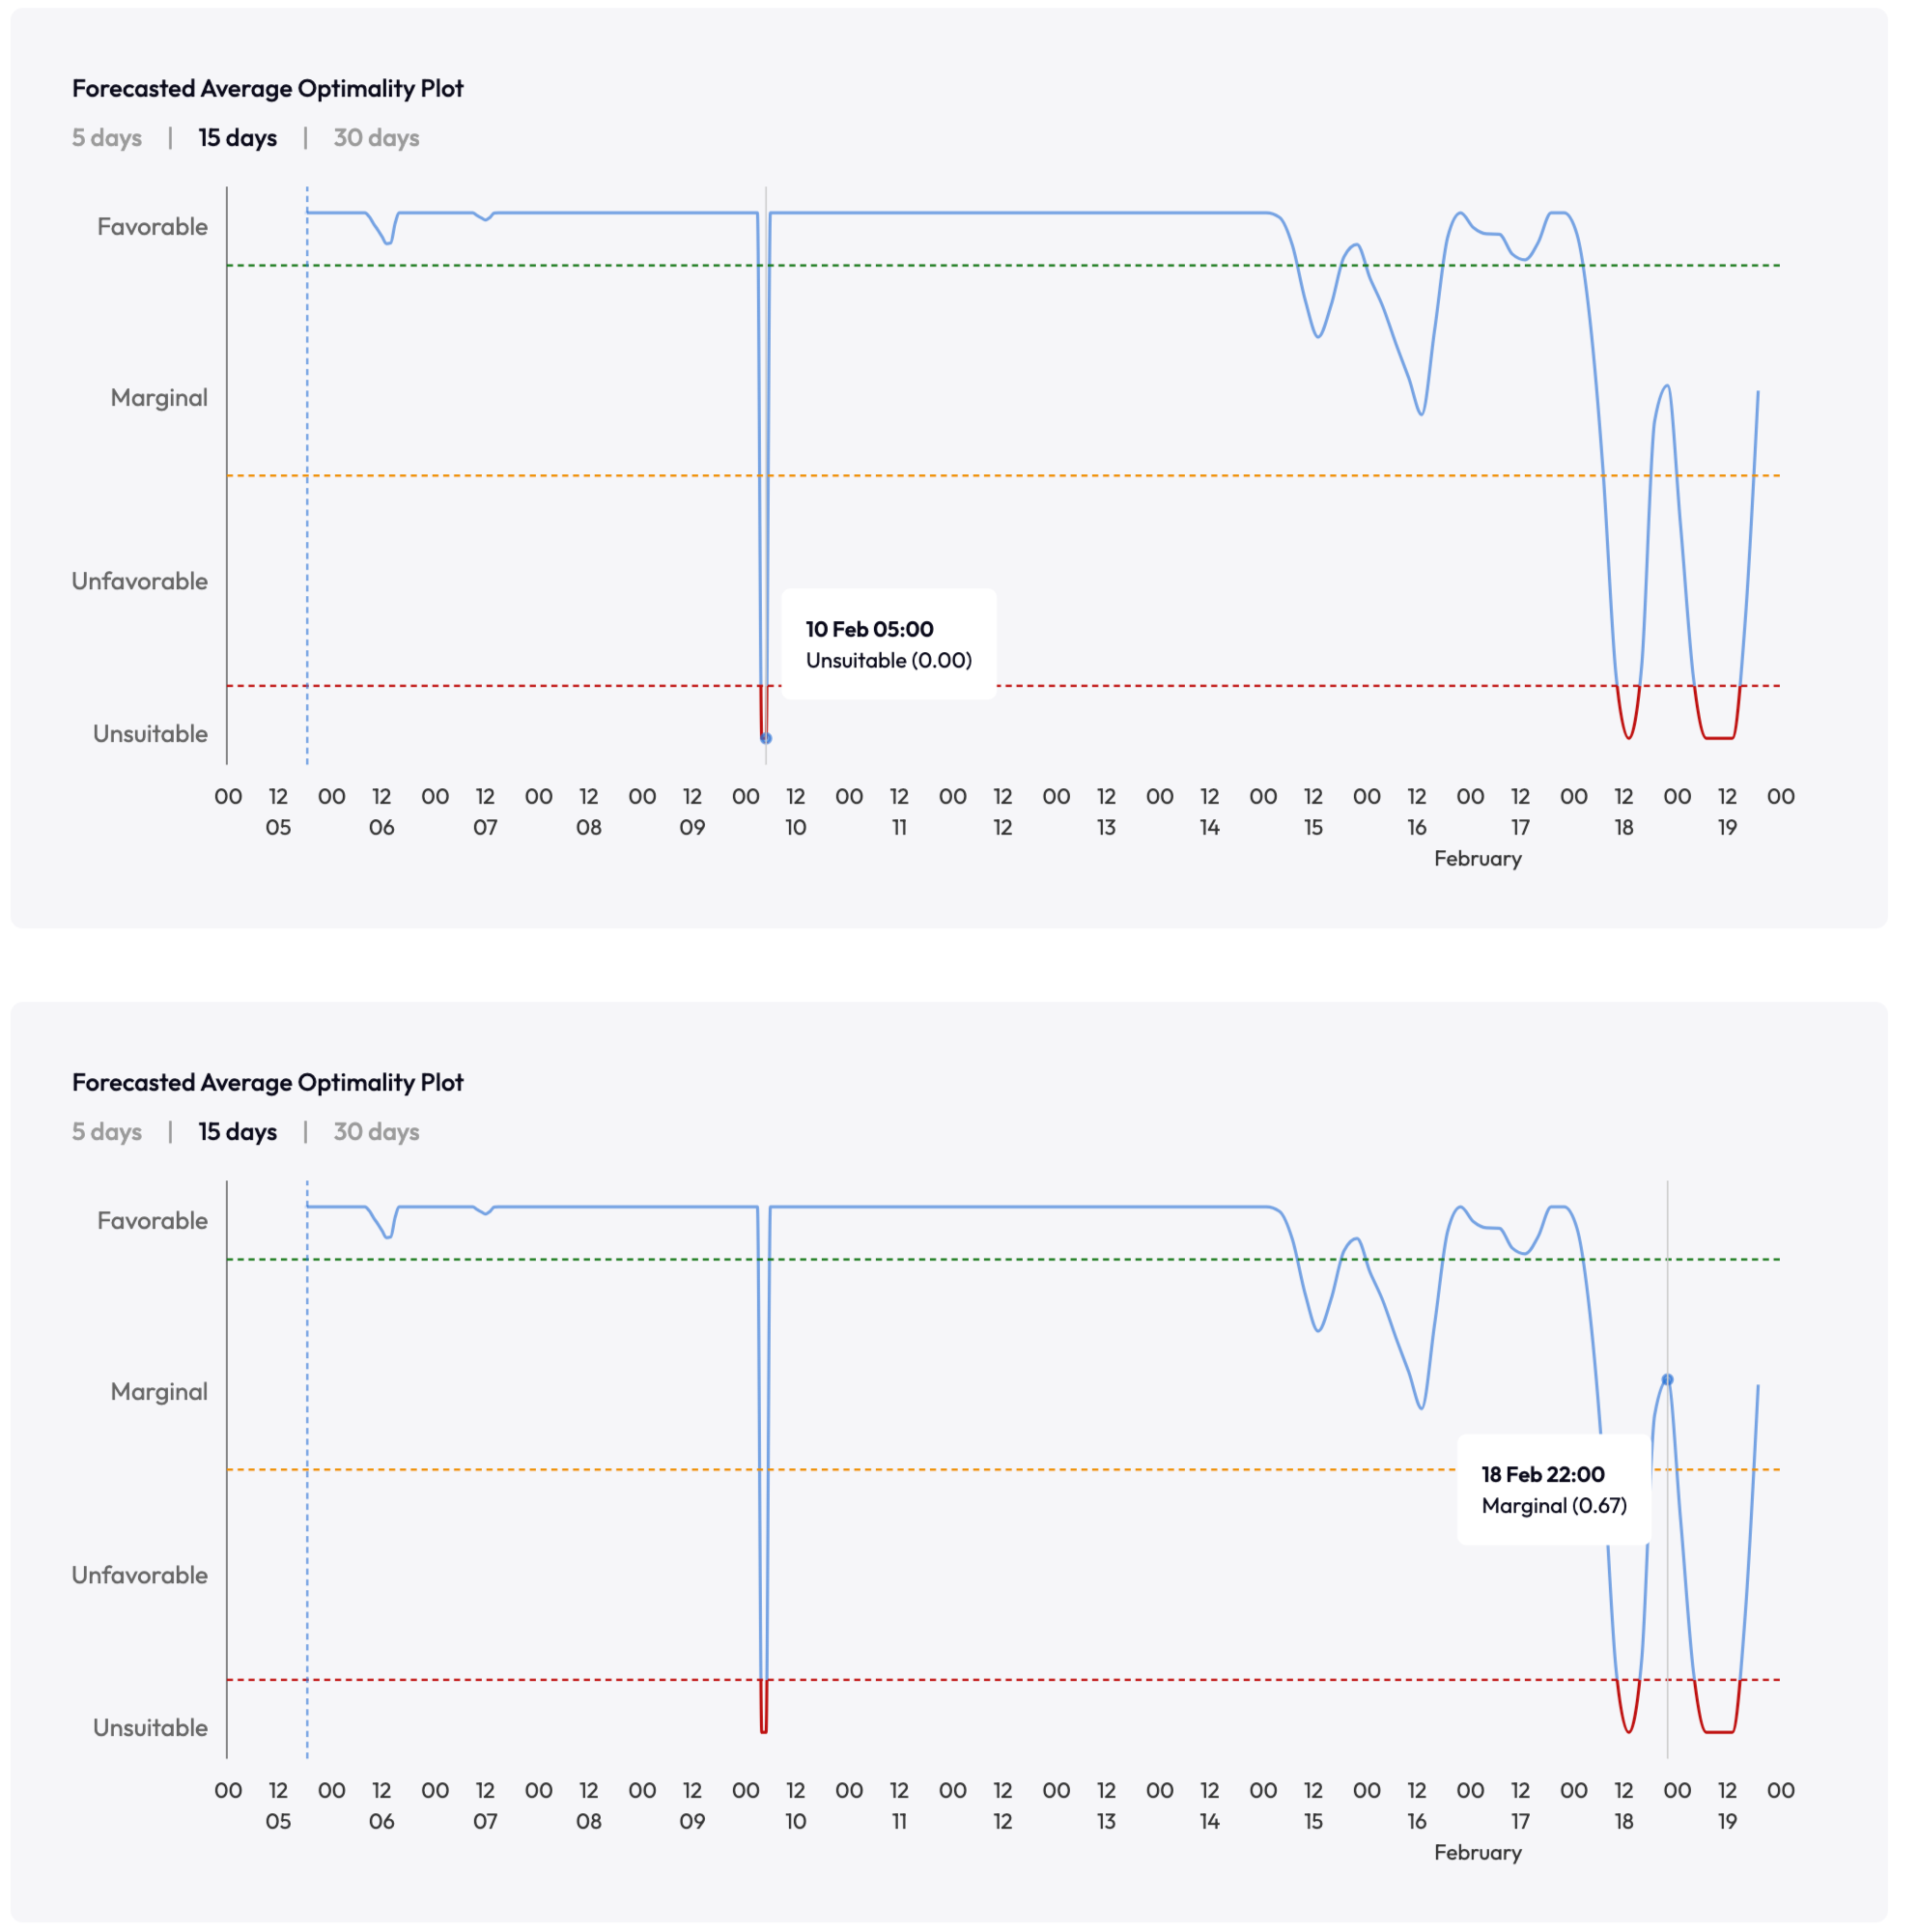
🔍 Dive into an Example: Understanding 0.2 vs. 1.0 Strictness
Imagine navigating the complexities of weather patterns and their implications on outdoor activities. Our example draws upon two pivotal moments in February to shed light on the strictness setting's dynamic role:
-
1. February 10th Scenario: A significant rainfall event breaches the set maximum threshold, juxtaposed against an otherwise optimal temperature. Under a strictness setting of 0.2, these conditions blend into an 'unfavourable' rating (0.1 to 0.5), reflecting a nuanced balance rather than an outright unsuitability. This demonstrates the system's capacity to average variables, providing a pragmatic overview.
-
2. February 18th Insight: Here, rainfall remains within permissible bounds, complemented by optimal temperatures. The result? A 'marginal' rating, indicative of a delicate equilibrium achieved between the variables, showcasing the smoothing effect of the default strictness.
-
Elevating the strictness to 1 unveils a more dramatic narrative. On February 10th, despite optimal temperatures, the index decisively marks the conditions as 'unsuitable' due to the rain event, illustrating the setting's heightened sensitivity. Conversely, the scenario on February 18th remains largely unaffected, highlighting the setting's precision in isolating and responding to specific unsuitable conditions without overgeneralizing.
This exploration into the strictness setting underscores ClimaLinks' commitment to providing customizable, insightful weather indices. Whether seeking a broad overview or a nuanced analysis, the strictness setting empowers users to tailor their weather data interpretation to align perfectly with their operational needs and preferences.
- Strictness set to 0.2 (Default Sensitivity)
- Strictness set to 1 (Very Sensitive)
Following this exploration, we'll guide you through leveraging task templates effectively with our task monitor function.